Meals in a Jar: From Pancakes to Baby Back Ribs, Just Add Water
Ready-made meals, good for months on a pantry shelf, work for busy nights, camping trips and power outages
/https://tf-cmsv2-smithsonianmag-media.s3.amazonaws.com/accounts/headshot/marina-koren-240.jpg)
/https://tf-cmsv2-smithsonianmag-media.s3.amazonaws.com/filer/20130222104057meals-in-jar-470.jpg)
In 1994, Julie Languille lived at the epicenter of the Northridge earthquake, which struck the Los Angeles neighborhood with a magnitude of 6.7. She and her family were without power for two weeks, and the long lines at nearby grocery stores soon began to shrink as food ran out.
“It just became really important to me as part of my feeling of security and good planning for my family to have meals on hand,” Languille says.
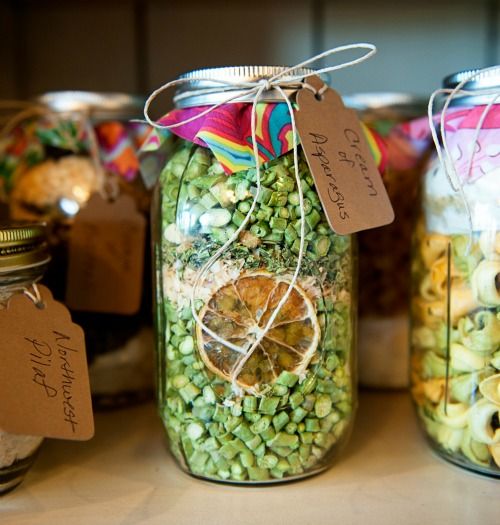
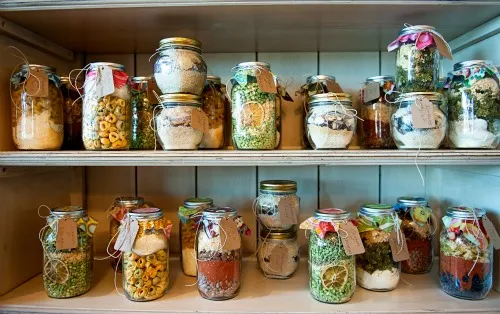
The Puget Sound resident, who also runs a dinner planning website, has been canning meals since, and her recipes, ranging from oatmeal and macaroni and cheese to braised chicken and pulled pork, are featured in a cookbook published next month. Two years ago, Languille installed a full-scale food storage unit in her home, filling it with almost 100 jars of basic ingredients like meats and veggies to complex ready-made recipes for baby back ribs and chicken noodle soup. Besides canning and sealing tools, an assortment of jars and enough room in the kitchen, the only other ingredients necessary are water and some heat.
In her cookbook, Languille writes that her bags, jars, and boxes of shelf-stable meals are “insurance against hardship or hunger.” Aside from earthquakes and hurricanes, ready-made meals significantly cut prep time for dinner on a busy weeknight. No washing, cutting, chopping and measuring—that was done weeks or months ago. Jars contain 100 percent of the ingredients necessary (other than water) for any given recipe, which nixes an extra trip to the grocery store for a forgotten item.
When stored in a cool, dry and dark place, dry meals can last for decades. Almost every fruit or vegetable can be dehydrated, a 24-hour process at high temperatures, and freeze-dried meats, which Languille says she buys online, have a long shelf life. But does the flavor of the ingredients hold up?
Languille says the answer is yes. When water is added, powdered eggs transform into fluffy beaten eggs and sour cream powder into dollops of the real stuff. Dehydrated apples, peaches and plums turn into gooey cobbler filling in the oven. Ground beef, once browned in a skillet and pressure-canned in a sterile jar for 75 minutes, becomes hearty chili when deposited into a pot of boiling water.
“The meals that I have on hand are tastier than the commercially prepared dried foods,” says Languille, who doesn’t use any artificial flavoring, coloring or preservatives in her recipes, save for a few packets of oxygen absorbers, which keep food from changing color or growing mold.
Languille replenishes her inventory four times a year, churning out nearly 40 canned jars in one weekend after a Costco-sized shopping trip. Whole meals are stored in quart-size jars and can produce soups and stews for parties of six to eight. Hamburger meat and chicken go in pint-size jars, which hold about a pound of meat and can serve four people
Languille uses a vacuum sealer to suck the air out of pouches filled with food. A dehydrator sucks out moisture from meats and vegetables, reducing their water content so they won’t spoil. A pressure canner preserves low-acid foods like meats, beans and vegetables.
Canning works in two ways. Pressure canning is used to preserve low-acid foods like meats, beans and vegetables. For example, a jar containing a piece of chicken is placed inside a pressure canner, which increases the pressure of the contents, causing steam to push out all of the air trapped inside. Then, the chicken remains stable at room temperature for long periods of time.
Water bath canning is used to preserve high-acid foods like fruits and tomatoes. Food is stored in sterilized jars, topped with warmed lids, and then boiled. This method works well for making jams and fruit butters and preserving spaghetti sauce and salsas
Canned and dry ingredients are packaged together in many of Languille’s recipes. Meat and sauce are cooked and canned together, then tossed into a jar with a sealed bag of pasta sauce and placed in a cupboard. Chicken canned with vegetables can be packaged with noodles to make chicken noodle soup or paired with flour and pie crust ingredients to produce a chicken pot pie.
Read on for the recipe for chicken noodle soup, which Languille says is her favorite, and others, featured in her forthcoming cookbook “Meals in a Jar: Quick and Easy, Just-Add-Water, Homemade Recipes.”
Chicken Noodle Soup
Makes 8 servings
For soup mix: In each of 8 quart-size canning jars or retort pouches, add, seal, and then pressure-can for 75 minutes:
• 1 cup chopped lightly browned chicken
• ¾ cup chopped onion
• ¾ cup peeled and chopped carrots
• ¾ cup chopped celery
• 2 tablespoons chicken soup stock
• 1 slice dehydrated lemon
• 2 teaspoons dried thyme
• 1 bay leaf
• Water, to cover and leave 1 inch of headspace in a 1-quart jar, or 2 inches in a retort pouch
For noodle packet: In each of 8 vacuum bags, add and then seal:
• 2 cups egg noodles
In each of 8 Mylar bags, tote bags, or vacuum bags, store:
• 1-quart jar or retort pouch chicken soup mix
• 1 packet noodles
Combine the chicken soup mix and 12 cups of water in a large pot over medium heat. Bring to a simmer and add the noodles. Simmer for about 10 minutes, or until the noodles are tender. Remove the bay leaf and lemon slice, and serve.
Omelet in a Bag
Makes 16 (2 to 3-serving) meals
In each of 16 zip-top quart-size freezer bags, package:
• ¼ cup powdered eggs
• 1 tablespoon finely grated Parmesan cheese
• 1 teaspoon dried chives or thyme
• ¼ teaspoon salt
• 1 pinch pepper
Heat a medium pot of water over medium heat to just simmering. Add ¹⁄₃ cup of water to the bag and squish the bag to combine (or put in a bowl and stir with a fork). Place the bag of omelet mixture into the water and simmer 10 to 15 minutes, until solid and just cooked through. Divide the omelet into portions and serve.
Peanut Butter Cookies
Makes 6 batches (about 3 dozen cookies each)
For cookie mix: In each of 6 vacuum bags, Mylar bags, or jars, add and then seal:
• ½ cup granulated sugar
• ½ cup brown sugar
• 1 tablespoon powdered eggs
• 1¼ cups flour
• ¾ teaspoons baking soda
• ½ teaspoon baking powder
• ¼ teaspoon salt
For peanut butter: In each of 6 vacuum bags or disposable 4-ounce containers, add and then seal:
• ½ cup (4 ounces) peanut butter
For shortening: In each of 6 vacuum bags, add and then seal:
• ½ cup shortening
In a Mylar bag, tote bag, or vacuum bag, store:
• 1 jar or pouch cookie mix
• 1 packet peanut butter
• 1 packet shortening
Preheat the oven to 375°F. In a large bowl, combine the shortening, cookie mix, and 2 tablespoons of water until a stiff dough forms. Roll into small balls about the size of walnuts and flatten with a fork in a crisscross pattern. Place on a baking sheet about 2 inches apart. Bake for 10 to 12 minutes or until lightly brown.
/https://tf-cmsv2-smithsonianmag-media.s3.amazonaws.com/accounts/headshot/marina-koren-240.jpg)